This site contains affiliate links. Please see Policies for more information.
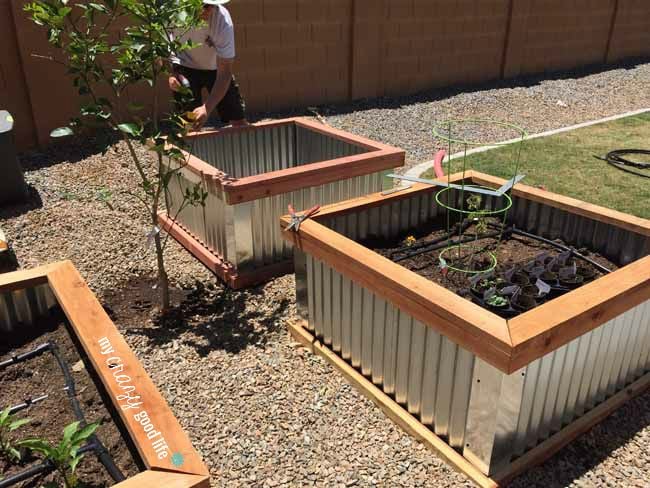
A few months ago my darling husband decided to appease my spontaneous idea of a garden (though historically, I have a very black thumb) and went a step further to build me a few beautiful DIY raised garden beds with corrugated metal and redwood.
I’ve had so many people ask for the details about these garden boxes and how he made them that I decided I had to share them here!
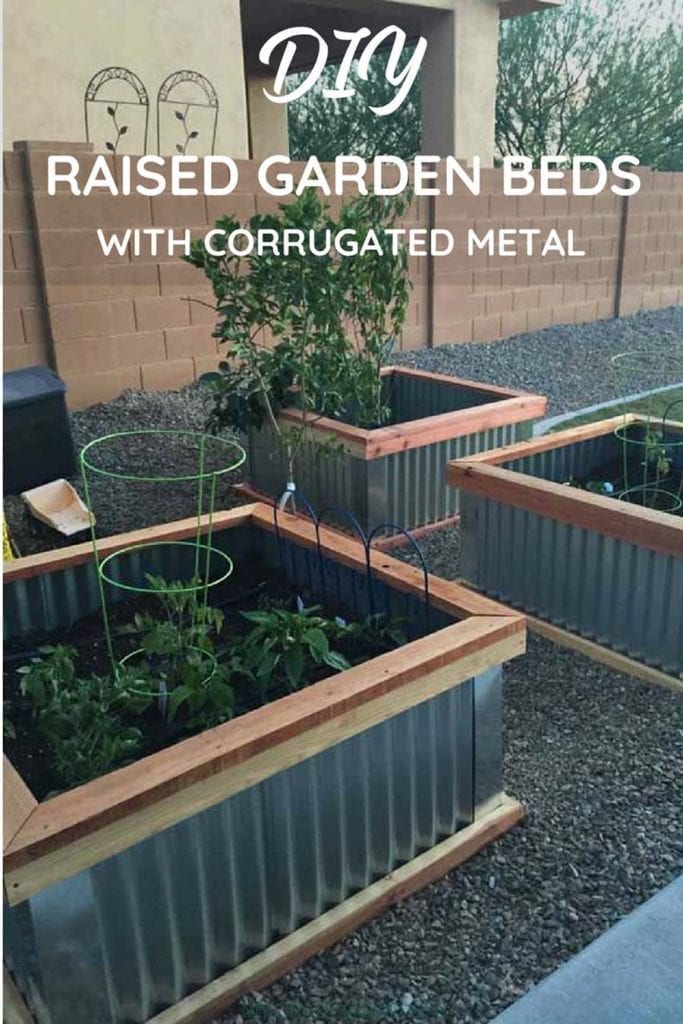
Growing our own vegetables is one of my favorite hobbies. I love that I can see them grow from seed to food and especially love that I know exactly what goes into them. I love when the kids (and sometimes the dogs…) pick snacks from the garden and I especially love going out with a big bowl before dinner and grabbing ingredients.
Links to the items you’ll need to build a raised garden bed:
These items will make one raised bed
- 2 – 4′ x 8′ pieces of corrugated metal or this Corrugated Garden Bed Kit (click here to buy on Amazon) if you’re unable to cut the metal. The garden bed kit is a convenient raised garden bed kit on amazon. It has short sides–it’s 10.5 inches deep and is just over 3 feet long.
- 1 – 4″ x 4″ x 8′ piece of metal flashing, cut into 4 – 22″ sections
- 4 – 2″ x 3″ x 8′ pieces of wood (we used redwood, it was not pressure treated wood) for the box frame
- 2 – 3″ x 4″ x 8′ pieces of wood ripped in half for the decorative box top
- Deck screws: click here to buy on Amazon
Optional Items:
- 4×4′ chicken wire (click here to buy on Amazon) for the bottom of the box. This is used to prevent animals from tunneling under the box.
- Soil Conditioner: click here to buy on Amazon
- Drip tube: click here to buy on Amazon
A few notes:
- Cutting the corrugated metal was definitely the toughest part. You’ll need two people to do it, and safety glasses are a must. We purchased a blade for the skill saw (click here to buy on Amazon) specifically used for cutting metal.
- These aren’t the most cost effective boxes you can make, but they’re beautiful! Each box cost us approximately $100. You can use different wood to get the price down.
- The corrugated metal has to be vertical for structural purposes.

Here’s how to build a raised garden box:
Time needed: 1 hour and 30 minutes
We loved making these planter boxes, and still use them–years later!
- Cut your supplies.
You’ll need to cut the corrugated metal and metal flashing into four 22″ sections, the redwood for the box into eight 48″ sections, and the redwood for the decorative top of the box into four 48″ pieces that are ripped in half (cut in half) to make it look a little nicer.
Remember, we did not use pressure treated lumber but you’re welcome to.
Here’s a picture for that last one, where you can see the thinner top piece: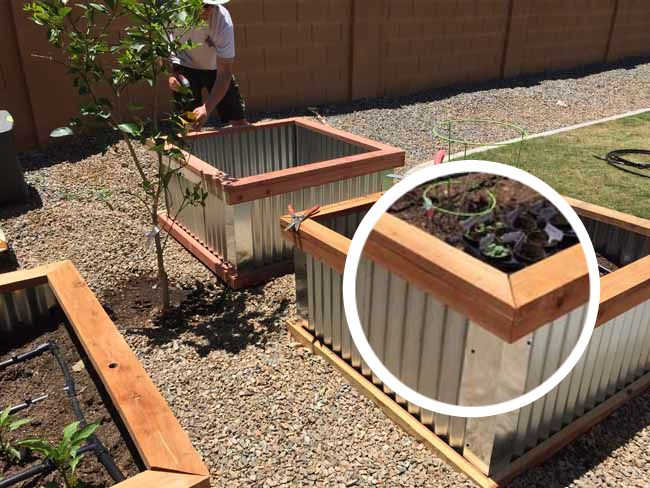
- Make the bottom frame
Use four of the 2″ x 3″ x 4′ pieces of wood to make the bottom frame of the box. Once we cut the corners to fit together, we used deck screws to secure them together.
To prevent your wood from cracking near the ends, drill pilot holes before using the screws.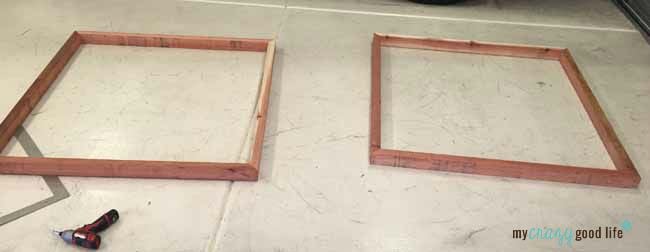
- Add flashing to sides
Next, we fastened the metal flashing to the corners of the bottom frame of the boxes. This was definitely easier to do with two people.
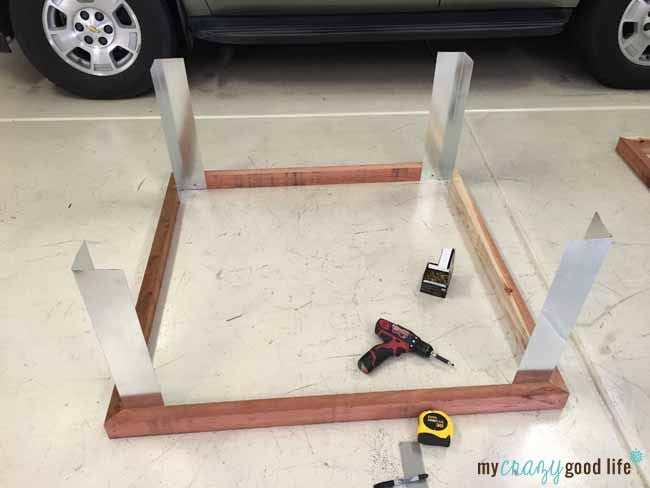
- Add the corrugated metal
Again, this step is easier with two people.
Steve sat inside the box while I sat outside with a right angle, making sure the metal was straight before he screwed it in place.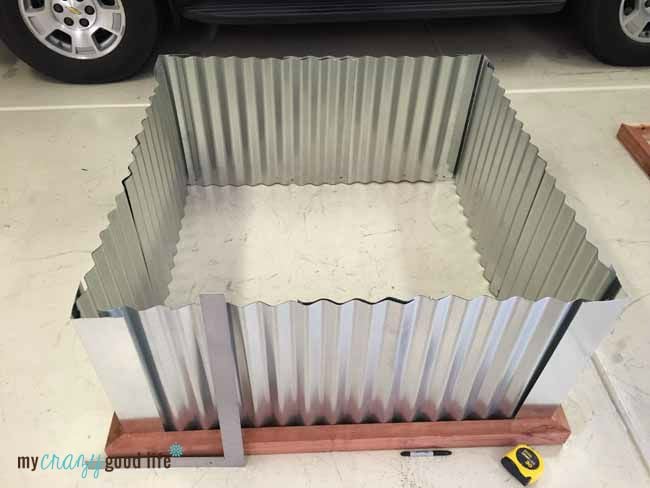
- Flip and secure
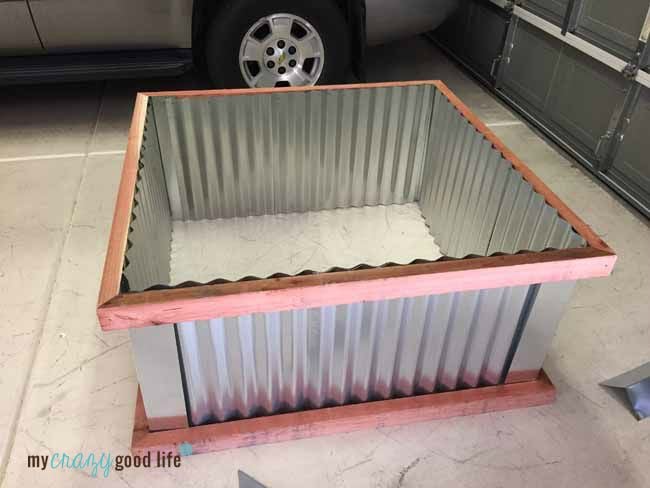
After securing the corrugated metal, we flipped the planter over so the metal fit just inside of the other box frame. We secured that with deck screws.
- Optional Step:
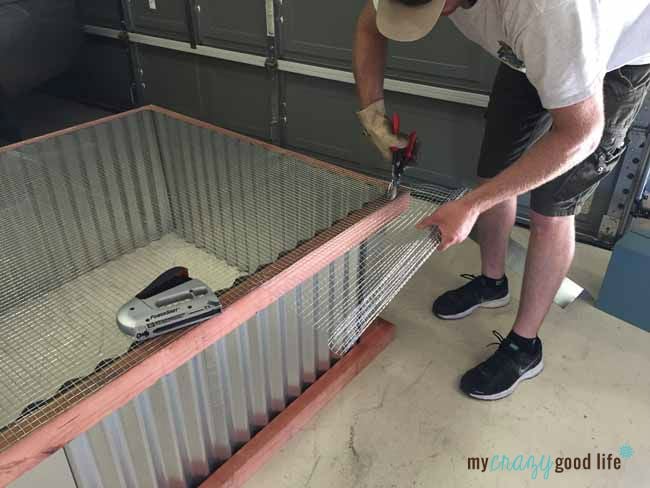
Secure the chicken wire to the bottom of the box with a staple gun. Again, we did this to make sure no animal could tunnel under the boxes.
- Add top frame
Flip the box back over and secure the top decorative frame to the box. This makes the box a bit more polished and gives you a place to sit or place your garden supplies.
- Add drip tubing
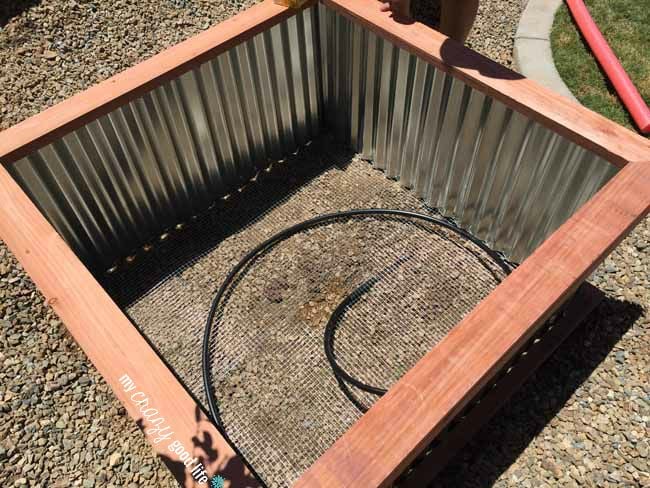
After securing the top, we carried the planter outside and pulled our drip tube through the chicken wire.
- Add soil
We filled the boxes with garden soil, making sure the drip tube stayed at the top.
How to fill your garden box:
- After you build a raised bed, you should ideally wait a day or two before planting seeds. You might think about which soil amendments (if any) you’d like to add, and plan out which plants will be best in the same box.
- If you’d rather not fill the entire garden bed with soil, some people like to put recyclable items at the bottom of their garden box first–empty milk containers, cardboard boxes, bottles, etc. This allows for better drainage and costs less money in soil.
- Remember that after your garden box is filled with soil it’ll compress a bit. I’d wait a day or two and fill with some more dirt before you start planting.
- If your beds need some shade, you can use a small garden trellis on each side and adhere landscaping fabric to each side, making a shade for your plants. I’ve found that tomatoes love the shade.
- We were gardening newbies when we started, but I have to say that I think we’ve done a pretty good job in the last few months!
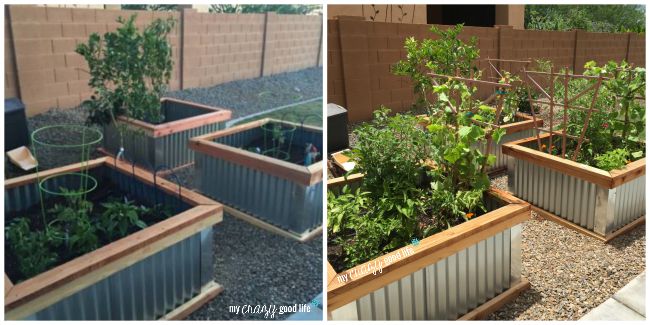
This garden bed project is one of the most fun DIYs we have done–you can use them for a herb garden, a glower garden, or a traditional vegetable garden and they’re pretty easy to build.
These beds are not rot resistant, but we have not had any issues with this in the years that we have had them up–they’ve helped us grow a ton of vegetables and they’re so easy to plant in every year.
Does the corrugated metal heat the soil in the boxes?
We have been asked this question a lot, and despite living in Tucson where the weather is hot and dry, we haven’t had an issue with the soil getting too hot. We have had great success growing many different types of herbs and vegetables in our raised bed garden boxes and wouldn’t do anything different if we built more down the road.
What have you grown in your raised bed garden?
We love growing tomatoes, zucchini, cucumbers, green beans, strawberries, carrots, and have had awesome luck with hot peppers. Last year we dedicated one garden box to just peppers–jalapeños, serranos, cayenne, and Carolina Reapers. I think hot peppers grow better when they’re together in a garden box. We have grown one pepper plant in a box with other vegetables and it didn’t do nearly as well (or get nearly as hot) without the other peppers.
Looking for another fun and easy DIY project? Try making this Giant Jenga game!






















I just started growing things too- watermelon so far. It’s really rewarding! Great job!
I was wondering what the drip tube is and how much do I need to use. Thanks!
Hey Charlotte,
We used drip tube or irrigation tubing, not sure what it’s called in your area! And we used about 15-20 feet of it per garden box. Good luck!
Have you had issues with these rusting?
Nope, no rust! Though, we kind of wished they would, it would have looked cool!
Have you had any issues with the metal being too hot or bowing from the weight of the dirt?
No, neither! I have never even touched the metal – just the wood on top to sit or rest my hands. And we live in Tucson, so it gets hot here, but I have noticed the heat on the metal or any bowing :)
If the metal gets hot, what other material would you recommend?
I don’t know about other material, Lisa. We chose these because we saw others around us had some that were similar, all corrugated metal. Here in Tucson the temperature hasn’t been a problem.
Becca, have you noticed if the soil gets unusually warm due to the corrugated metal getting hot?
Hi Roberta,
I haven’t noticed the soil getting too warm or hot! I had a fruitful garden last year, maybe because the metal is so thin?
Thank you!
it should not be an issue unless you make a box 1ft wide. as long as they are 2 ft wide or more it will be fine. For added protection you can line the inside with cardboard. foam panels , or some thermal break film.
I see that you created these on top of gravel… We have a large concrete pad next to our shed in the backyard. Do you think creating one of these structures on that would be deep enough to plant tomatoes, etc?
Hi Kathleen,
We put them on top of gravel, and I plant tomatoes in mine! The only concern I’d have is that there would be no place for extra water to drain. They’re definitely deep enough for tomatoes, though! I have some in mine right now :)
If you have at least two feet of depth you’ll be done for things like tomatoes.
Did you do any research regarding lining the inside of the boxes so the soil does not damage the metal? i.e. is that as necessary as my husband thinks it is? We live in Sacramento, it can get to 100+, I assume Tucson is hotter…..
you can cut them meta with tin snips, it takes a little longer but no loud noises and metal flying everywhere:) Also I use roofing screws to prevent water leaking threw to the wood at each hole..
Can you please just explain the drip hose?
We use them to water the garden! Set a timer and it’s automatic :)
Love the look of these. Any idea how much it costs to make one of these on average? Also, what you put on the bottom is actually hardware cloth and not chicken wire.
Hi there, it was about $100/box.
We are attempting to make the garden boxes. We had built square foot gardens but they have fallen apart and also not high enough to keep the rabbits out…ugh! We have completed up until the metal flashing…and are second guessing on the corrugated metal instructions…our dimensions are just a bit different. Did you cut the metal so the you had four pieces to the length of each side and secured them to the top and bottom corner. OR did you cut down to height and wrapped the metal around the inside of the box?! Looking for a bit of clarification….thanks so much.
Hi there! I’m not sure I’m following your question so please let me know if you’re still confused.
The height of the metal determines the height of the boxes. We didn’t wrap the metal-we cut the width and overlapped when necessary.
I was going to ask the same thing. From the pictures, it appears that the flashing is much wider than 4 inches, and that it was bent into a 90 degree angle to form the corners. Could you please clarify the directions for the flashing?
Hi! The flashing (corners) are bent at 90* and come that way from Home Depot. We cut them to length, which determines the height of the boxes.
Now that makes sense! I think the link in the article is to flat flashing that comes in rolls. I’m guessing this is the one you actually used: http://www.homedepot.com/p/Construction-Metals-4-in-x-4-in-x-10-ft-Galvanized-Steel-L-Flashing-LF44G/202093207 . Thanks!
I want to build similar boxes to the ones depicted here but slightly taller. I don’t know where in Toronto to purchase the corrugated metal sheeting and the flashing. Could you tell me where you bought the materials?
Hi Tom! We purchased our materials at Home Depot!
Thank you so much for posting this. I built two 4′ x 8′ boxes and they work great. We chose to go with pressure-treated wood for the base and the top frame. Then I chose redwood pickets for the topper. Got our stuff at Lowes and would say around $100 per box.
This is awesome news!
If your using your bed for vegetables then you’ll want to replace the pressure treated wood for a different material. It is full of dangerous chemicals that you do not want to grow your food with.
Thanks! I appreciate your awesome attention to detail and links!
The ledge on these boxes looks like it could be sat on but I’m suspicious that the metal would not be heavy enough gauge to support that – can you clarify? Beautiful boxes!
I sit on them all the time! :)
Hi Becca- I love the design of your raised garden beds and am planning to try to replicate them in my garden this spring. One question please — I would like to build mine in a 4′ by 8′ size rather than the 4′ by 4′ size you did. Aside from the obvious need to lengthen the side boards accordingly, is there anything else you would recommend I alter from your plan? Specifically, do you think a 4×8 bed would need any additional reinforcing along the long side, either to prevent bowing out or to provide additional support to the top rail? Thanks in advance for any advice you can offer here.
Hey there! We’d keep the corrugated metal going vertical, and add a support at about the 4 ft mark for both the wood rail and to help prevent bowing :) Good luck! We are making another one this weekend :)
I’m curious if you’ve had any issues with the weight/pressure of the soil pushing out on the metal. I’ve seen this happen on horizontally-installed corrugated metal, but not vertical. I suspect what you have is stronger. What did you use to cut it?
No issues with the weight of the dirt.
You can use a cut off wheel on an angle grinder for the metal–they also make a metal saw blade for a skill saw :)
I love your raised garden beds! I’d like to build some in my yard this year. Do you know what the gauge was on the corrugated galvanized steel panels that you used?
Hi Kim, I believe it’s 29 gauge – we grabbed it from Home Depot :)