

This site contains affiliate links. Please see Policies for more information.
When it comes to 3D printing, knowing the terminology is important. If the settings are off because you don’t fully understand the terms, then you can end up wasting a lot of money. Two of the most important terms to know are “Infill” and “Shell.” Both infill and shell are used to give strength to the print but if used incorrectly can completely change the print.
When we purchased our in-home 3D Printer, we learned the hard way–these terms apply to the settings on your printer, and it pays to know what they mean! Otherwise, you could end up spending quite a bit of money on filament.
To download this free printable and keep it by your 3D Printer, click here.
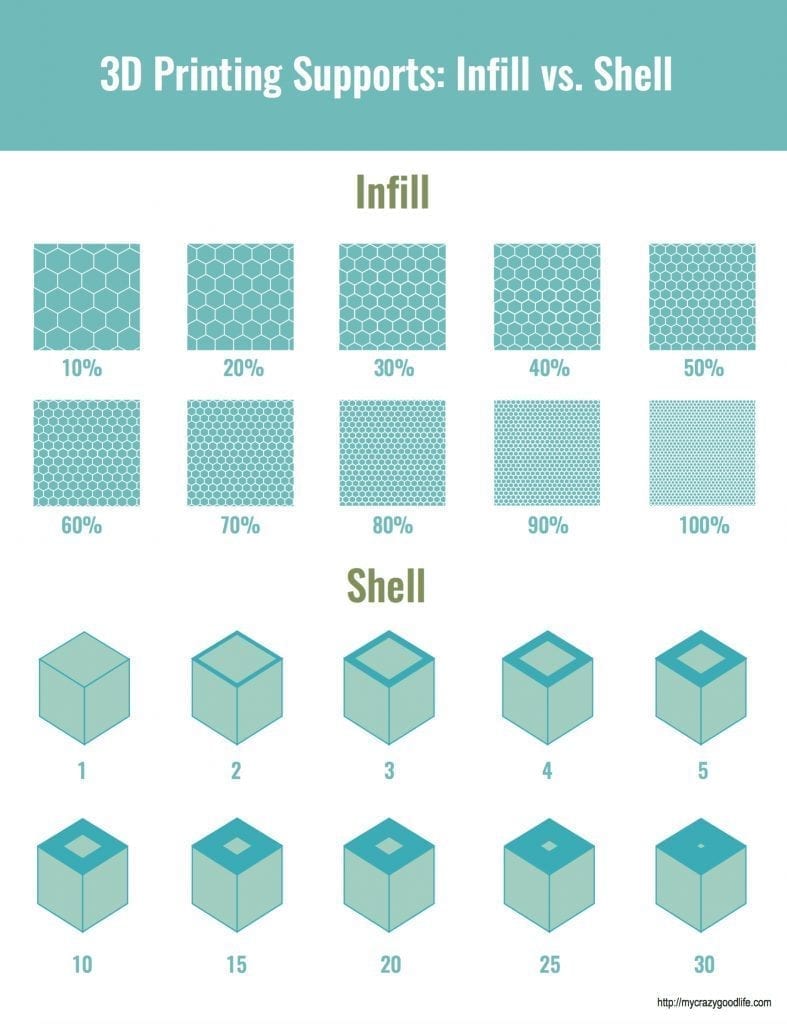
What is Infill?
Infill is simple to understand, however, easy to mess up when printing. The infill setting will determine how solid a print will be when finished. To water down the definition, infill means filled in with the material. Most prints will not require the highest setting of infill. Instead, 20-30% will do just fine. The important thing to keep in mind is that if you use the highest setting for infill, you will be using a lot of filament. When you use a lower % of infill, the printer will use very specific patterns when filling in the print to give maximum strength.
For example, your 3D printed hammer should probably have a high infill, where say… the dice you print could probably print at a lower infill.
What Are Shells?
Shells are exactly what they sound like, the outer perimeter of a print. However, don’t let the word “outer” fool you. Shells are printed side by side starting wth the outer layer and ending towards the center. The best way to understand is by using a 3d printed cup. If you set the number of shells to the highest available when printing a cup, you will end up with just a curved block (a solid block, trust me on this) instead of a hollow cup-like print. Usually, 2 shells will be all you need and going more than 5 shells risky. If you want to add strength to an item rather than make just the outside solid (and not change the shape too much) increase infill instead.
Infill Vs. Shell
Both infill and shell will add to the strength of a print and can also be used together for combined strength. However, it’s important to keep in mind what you’re printing and what would work well. The cup mentioned above is a great example to describe the differences. Shells will add strength to the cup, but too many will close up the cup giving you a block. Infill will help strengthen the cup and do little to no damage to the intended shape of a print. If you want a solid object, say an action figure, you will want to use both infill and shells to give the strength you need and not waste material. Setting the infill to about 30% with 2 shells will make you a strong print and not use as much filament.
Knowing the terms and settings is half the battle when 3D printing. Once you get the hang of 3D printing, then it becomes a fun way to get creative!


Thanks, Becca, very informative. I am a novice in 3d printing. This will definitely help me printing and I am gonna share it.