

This site contains affiliate links. Please see Policies for more information.
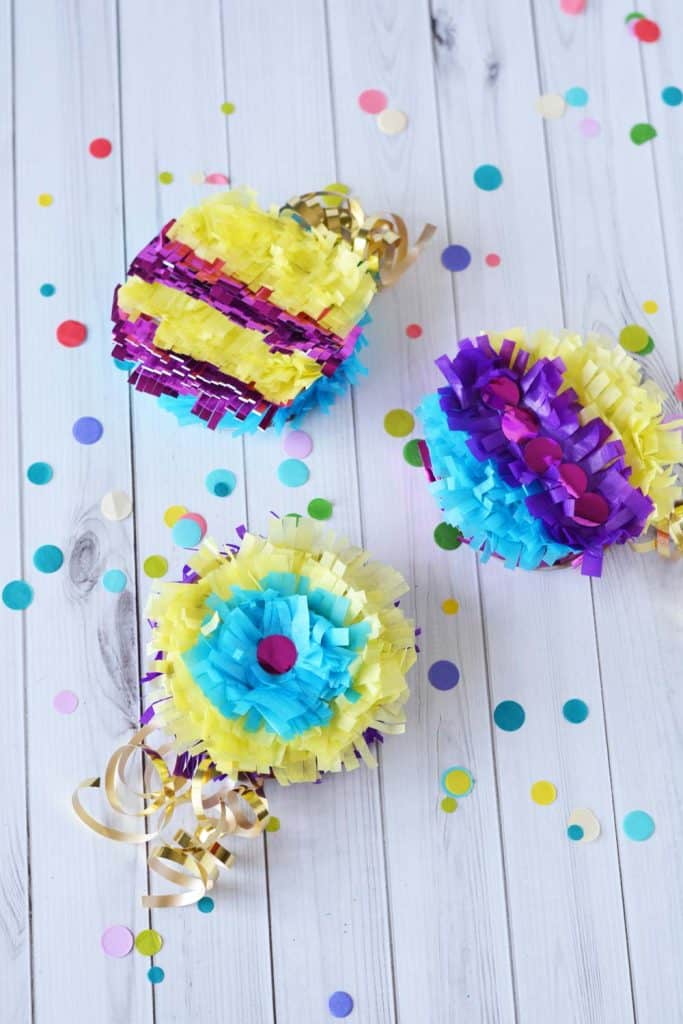
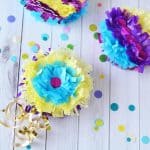
Have you ever wanted to make your own mini piñatas? These mini piñatas are a great party craft idea! Let me show you how to make them for yourself so you can celebrate anytime – piñatas aren’t just for birthday parties anymore.
These mini pinata favors are so adorable, and they’re even more fun to make than they are to play with. One of the best things about being an adult is finding ways to have as much fun as the kids. This craft is perfect for inspiring some childlike joy for children and adults alike.

DIY Mini Piñatas are always a fun idea to deliver a special surprise or a festive addition to any party, and they’ll bring out the kid in nearly everyone!
Materials Needed To Make A Mini Piñata:
- Cardboard (use an empty cereal box, cracker box, poster board, or even toilet paper rolls)
- Small bowl or dish (ours is 3.5″ in diameter)
- Pencil
- White glue
- Tissue paper (you could use crepe paper streamers as well)
- Scissors
- Candy
- Curling ribbon
- Hot glue
- Metallic treat bags
- 0.6″ circle paper punch
How To Make Mini Piñatas:
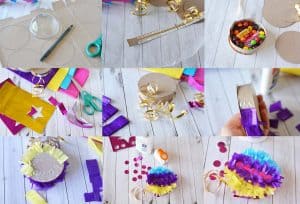
If you’re a visual learner, you can see a collage showing how these steps below.
- Use the small dish turned upside down as a template to trace circles that you’ll cut out of the cardboard. You will need 2 circles per piñata.
- Cut a small strip of cardboard, about 1″ x 12″. Cut a piece of curling ribbon about 18″ long. Use hot glue to attach the curling ribbon to the long strip of cardboard and allow to dry completely.
- Add hot glue to one circle, near the edge and carefully attach the cardboard strip to the hot glue. Make sure to keep the ribbon sticking out of the edge of the piñatas. Let set.
- Fill the container with candy and other goodies before adding hot glue to the edge of the strip (that’s attached to the circle) and placing the other circle on top to close the piñata.
- Cut 2 more shorter pieces of curling ribbon (8-12″) and adhere them to the edge of the pinata as shown with hot glue.
- Fold one sheet of tissue paper in fourths (or 6ths, if your paper is large) by folding in half and then in half again.
- Trim off about 1″ of tissue paper, cutting all four sheets at once and then cut small fringe marks or strips into the paper. Trim the fringe to about 1″ wide and begin to adhere it to the edge of the piñata with glue. Note: Using one single piece of tissue paper is challenging. It rips easily or the glue begins to leak through very quickly, therefore two sheets work best. Just glue two sheets together at a time, place glue on the edge of the card board and continue all the way around until completely covered.
- Use those same strips of tissue paper and begin to cover the mini piñatas. You can choose any design you want – circles, lines, etc. Once you have all of your tissue paper on the piñata, fluff it gently with your fingers.
- Add accents with the metallic paper gift bags, if desired. We used a circle punch to cut out some circle accents and added them to the piñata with glue.
- If you place your ruffled tissue paper in a line you can trim them to almost the correct size (like the three color piñata) or you can extend the paper beyond the edge of the piñata and trim later, like the yellow and pink piñata.
- To open, pull a piece of curling ribbon. Only one will open the piñata.

Why should I make a Mini Pinata?
- birthdays
- to share a surprise with friends
- theme party
- any celebration
- baby showers (such a cute party idea)
What do I stuff in my mini piñatas?
Mini piñatas can be stuffed with anything that you can fit inside! Fill them up with candy, treats, small gifts, and more. They’re even great to make as a fun way to deliver a little note!
I always get great ideas when I head to a store that has party supplies, so if you’re in a creative rut I’d recommend walking the aisles for inspiration.
Can I use this tutorial to make a large piñata?
You can make your piñatas as big or small as you like! All you need to change is the size of your cut outs. You could also make them into whatever shape you like!
The process can become a little tricky if you are trying to make a piñata that is a more intricate shape. I’d recommend you make these small ones first to get the process down and then go on to create bigger and more detailed pinatas.
Looking for more fun activities or projects?
- Margarita Drink Tray
- How to make Cricut Paper Flowers
- Super easy Painted Jars
- How to make a reverse canvas
- Make a DIY Stress Ball
- Confetti Umbrellas
- How to make a Cinnamon Candle
DIY Mini Pinatas
Ingredients
- cardboard
- small bowl or dish
- pencil
- scissors
- curling ribbon
- hot glue
- Candy or other goodies
- white glue
- tissue paper
- metallic treat bags optional
- .6" circle punch
Instructions
- Use the small dish turned upside down as a template to trace circles that you'll cut out of the cardboard. You will need 2 circles per piñata. small bowl or dish cardboard pencil scissors

- Cut a small strip of cardboard, about 1" x 12". Cut a piece of curling ribbon about 18" long. Use hot glue to attach the curling ribbon to the long strip of cardboard and allow to dry completely. curling ribbon hot glue
- Add hot glue to one circle, near the edge and carefully attach the cardboard strip to the hot glue. Make sure to keep the ribbon sticking out of the edge of the piñatas. Let set.
- Fill the container with candy and other goodies before adding hot glue to the edge of the strip (that's attached to the circle) and placing the other circle on top to close the piñata. Candy or other goodies
- Cut 2 more shorter pieces of curling ribbon (8-12") and adhere them to the edge of the pinata as shown with hot glue.
- Fold one sheet of tissue paper in fourths (or 6ths, if your paper is large) by folding in half and then in half again. tissue paper
- Trim off about 1" of tissue paper, cutting all four sheets at once and then cut small fringe marks or strips into the paper. Trim the fringe to about 1" wide and begin to adhere it to the edge of the piñata with white glue. white glue
- Note: Using one single piece of tissue paper is challenging. It rips easily or the glue begins to leak through very quickly, therefore two sheets work best. Just glue two sheets together at a time, place glue on the edge of the card board and continue all the way around until completely covered.
- Use those same strips of tissue paper and begin to cover the mini piñatas. You can choose any design you want – circles, lines, etc. Once you have all of your tissue paper on the piñata, fluff it gently with your fingers.
- Add accents with the metallic paper gift bags, if desired. We used a circle punch to cut out some circle accents and added them to the piñata with glue. metallic treat bags 6 inch circle punch
- If you place your ruffled tissue paper in a line you can trim them to almost the correct size (like the three color piñata) or you can extend the paper beyond the edge of the piñata and trim later, like the yellow and pink piñata.
- To open, pull a piece of curling ribbon. Only one will open the piñata.


Did you love this recipe?
Make sure to comment below so we can chat about it! Or follow on your favorite social network for even more family recipes.